Getting Started with ESP32: Building an OLED Display Project
Published Jan. 22, 2025, 2:29 p.m. by Ezra Ogori
In this blog, we'll explore how to interface an ESP32 microcontroller with an SSD1306 OLED display, covering the hardware setup, circuit connections, and programming. The goal is to display text on the OLED screen using the Adafruit GFX and Adafruit SSD1306 libraries.
What You Will Learn
- Overview of the SSD1306 OLED Display
- Required Components 3.Circuit Connection
- Programming the ESP32
- Code Walkthrough
- Expected Output
1. Overview of the SSD1306 OLED Display
The SSD1306 OLED display is a compact, high-contrast screen commonly used in embedded systems. Key features:
- Resolution: 128x64 pixels.
- Communication: I2C .
- Operating voltage: 3.3V - 5V.
- Power consumption: Very low.
2. Required Components
- ESP32 microcontroller board.
- SSD1306 OLED display (128x64 pixels, I2C interface).
- Breadboard and jumper wires.
- USB cable for programming the ESP32.
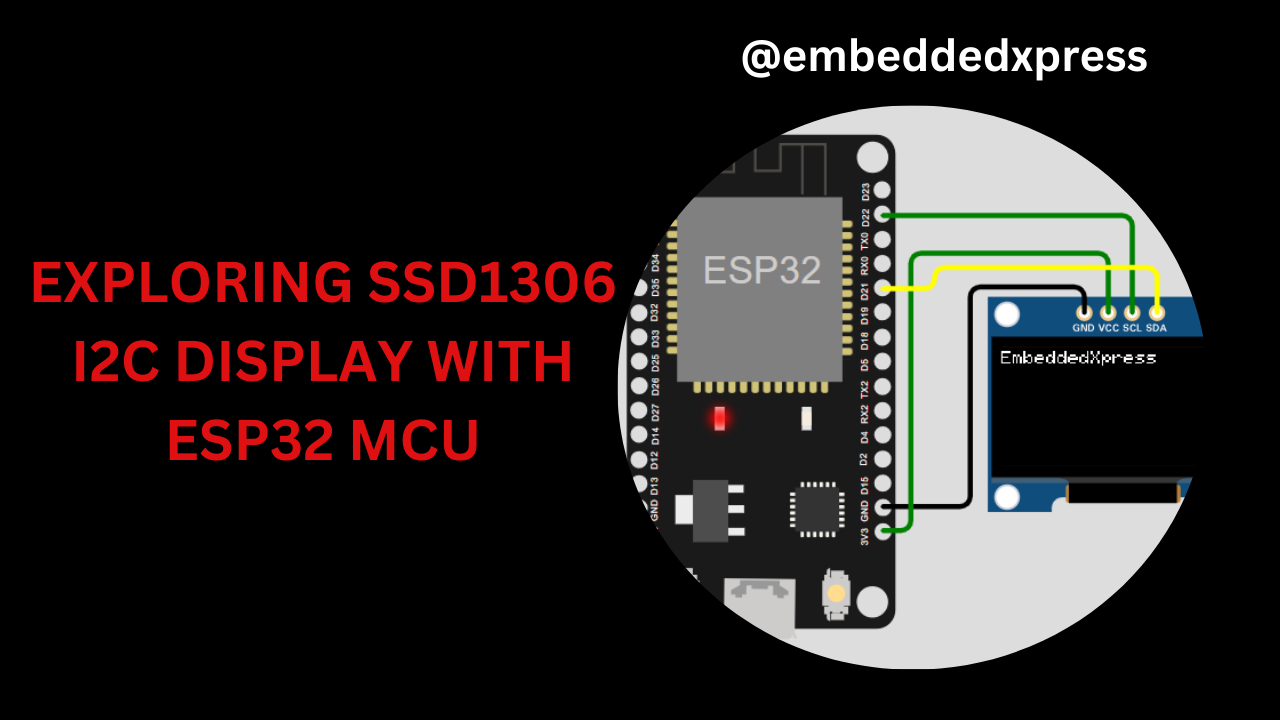
3. Circuit Connection Pin Mapping
Connect the OLED display to the ESP32 as follows:
| OLED Pin | Function | ESP32 Pin |
|---|---|---|
| VCC | Power Supply | 3.3V or 5V |
| GND | Ground | GND |
| SCL | I2C Clock | GPIO 22 (SCL) |
| SDA | I2C Data Line | GPIO 21 (SDA) |
Ensure the I2C pins on your ESP32 match the default configuration (GPIO 21 for SDA, GPIO 22 for SCL).
4. Programming the ESP32 Installing Libraries
Before diving into the code, install the following libraries in the Arduino IDE:
Adafruit SSD1306: For OLED control.
Adafruit GFX: For graphics rendering.
To install:
Open Arduino IDE./PlatformIO
Go to Tools > Manage Libraries.
Search for Adafruit SSD1306 and Adafruit GFX.
Click Install.
5. Code
#include <Wire.h>
#include <Adafruit_GFX.h>
#include <Adafruit_SSD1306.h>

#define SCREEN_WIDTH 128 // OLED width,  in pixels
#define SCREEN_HEIGHT 64 // OLED height, in pixels

// create an OLED display object connected to I2C
Adafruit_SSD1306 oled(SCREEN_WIDTH, SCREEN_HEIGHT, &Wire, -1);

void setup() {
  Serial.begin(9600);

  // initialize OLED display with I2C address 0x3C
  if (!oled.begin(SSD1306_SWITCHCAPVCC, 0x3C)) {
    Serial.println(F("failed to start SSD1306 OLED"));
    while (1);
  }

  delay(2000);         // wait two seconds for initializing
  oled.clearDisplay(); // clear display

  oled.setTextSize(1);         // set text size
  oled.setTextColor(WHITE);    // set text color
  oled.setCursor(0, 2);       // set position to display (x,y)
  oled.println("EmbeddedXpress"); // set text
  oled.display();              // display on OLED
}

void loop() {
}
6. Code Explanation
Initialization: The oled.begin() function initializes the OLED display. If the display fails to initialize, the program halts with a message sent to the Serial Monitor.
Displaying Text:
oled.setTextSize(1): Sets the size of the text (1 is the smallest size).
oled.setTextColor(WHITE): Sets the text color to white.
oled.setCursor(x, y): Positions the text at coordinates (x, y) on the screen.
oled.println("EmbeddedXpress"): Prints the text to the OLED.
Updating Display:
The oled.display() function refreshes the screen with the current buffer.
7. Expected Output
Once the ESP32 is programmed and powered, the OLED will display:

Happy coding!
Jasontic Sept. 4, 2025, 2:12 a.m.
Venture into the breathtaking universe of EVE Online. Forge your empire today. Explore alongside thousands of players worldwide. [url=https://www.eveonline.com/signup?invc=46758c20-63e3-4816-aa0e-f91cff26ade4]Start playing for free[/url]